The Official Website of this Non-Professional Woodworker ™ |
|
|
|
|
|
|
It can be difficult for some craftsmen to stain a project made from a beautiful hardwood like walnut. A purist might say that staining any wood is unnatural and thoughtless. Sometimes though, a wood requires stain to bring out its hidden beauty. And as woodworkers, most of us appreciate the beauty of grain in wood and it's uncommon for us to hide it. Wouldn't it be nice to see this inner beauty develop without a can of commercial stain? A few household ingredients will create a potent chemical stain that will profoundly change the color of a wood with a high tanin content... most notably, oak and walnut. Don't forget to wear your rubber gloves and eye protection!
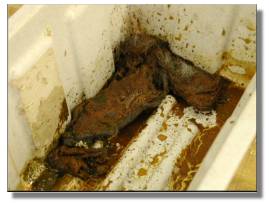
You will need a bucket or some other means to contain the mixture. I use a long, narrow plant holder that is typically placed on a porch rail. Unroll the steel wool pad and place it in the bucket. Toss in a few old nails or any other rusted items you many have. Next, place 1 tablespoon of salt into a spray bottle and add ½ cup of water. Shake the bottle until most of the salt has dissolved. Spray the steel wool and nails with this mixture until the bottle is empty.
Prepare Your Project There will be a tendency for this stain to raise the grain of the wood. In certain situations, it may be preferable to wipe down your project with a wet rag to raise the grain, allow the surface to dry, and sand it lightly with 220 grit sandpaper.
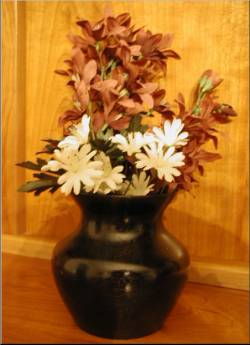
The mixture will remain somewhat potent if kept in a sealed glass jar. Within a year though, the chemical will start to turn green and the results will not be as astounding. And though I hate to say it....A coat of Minwax "Ebony" stain on top of this mixture will further deepen the color and give you a very, very deep black color. Neutralizing the Surface Before applying a finish, it is a good idea to mix some baking soda with water and wash the surface of the wood to neutralize the acid in the vinegar. Then rinse the project surface well with plain water. Wow!
|
|
|
|
|
|

 Ingredients: