|

 There are a few woodworking and crafts catalogs that offer a "liquid patina" that instantly ages copper. These concoctions chemically react with the copper and create a mesmerizing parade of patterns and colors. I've never had the time or patience to try my hand at this chemical art form, but I imagine that it's quite rewarding. Honestly, my shop is too crowded with tools and junk to set up a place to work with the copper and patina mixes. There are a few woodworking and crafts catalogs that offer a "liquid patina" that instantly ages copper. These concoctions chemically react with the copper and create a mesmerizing parade of patterns and colors. I've never had the time or patience to try my hand at this chemical art form, but I imagine that it's quite rewarding. Honestly, my shop is too crowded with tools and junk to set up a place to work with the copper and patina mixes.
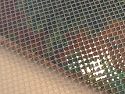
Luckily, a very cool copper veneer product is available that allows anyone to jump right into using this color copper without the chemical mess. This patinated copper sheeting is unbelievably gorgeous. There are 25 varieties of this copper veneer but countless patterns and colors that show on each sheet.
The copper patina sheets are a unique and intriguing material that will surely have family, friends, and customers lining up to get their hands on any project you create. You'll find that copper veneer works much like wood veneer.
Keep in mind that the edges of the copper veneer can be quite sharp. Exercise care when handling this material to prevent injury. If in doubt, wear gloves or other suitable protection. The copper color/patina is only on the surface of the sheet so do not apply tape to the show side of the copper sheet as it will damage the surface when the tape is removed. Also note that sharp bends and creases can cause the coloring to come loose.
Simple Tricks and Basic Tools Yield Outstanding Results
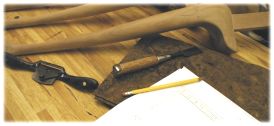
Copper veneering requires no significant investment in tools or machinery. A few basic tools are all you need.
Smooth It Out
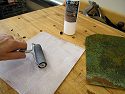
Copper veneer is rolled onto a cardboard tube for shipping to protect it during transit, but it's possible that your copper will have a small crease in one or two areas. This is normal and easily repaired with a polyurethane roller and a piece of thick vinyl material.
 To remove a crease, set the copper on a clean and smooth surface. Then place a piece of vinyl material over the blemish and use the roller to flatten the wrinkle. Flip the copper sheet over, set the vinyl in place, and then roll the back side as well. A few passes will do the trick! To remove a crease, set the copper on a clean and smooth surface. Then place a piece of vinyl material over the blemish and use the roller to flatten the wrinkle. Flip the copper sheet over, set the vinyl in place, and then roll the back side as well. A few passes will do the trick!

Copper Crease |

Roll It Out |

Crease Fixed! |
Stickin' It
There are two ways to adhere copper to a substrate. Each is significantly different from the other; however, both will achieve good results. The choice to use one over the other depends on several factors.
|
Method 1:
Solvent Based
Contact Cement
|
Method 2:
TC-20™ Copper Adhesive |
Bonds to… |
Porous and non-porous surfaces including melamine, laminates, most metals, and plastics |
Porous surfaces such as wood, MDF, plywood, and particle board |
Bond Strength |
Satisfactory for most applications but can peel off if not protected. Contact cement does not harden when cured. |
Excellent, if applied correctly. TC-20 dries hard which makes edges stronger and panels that can withstand more abuse. |
Machining |
To saw a copper veneered panel, you must place another board on top of the panel to prevent tear out damage. |
Cuts cleanly with a sharp saw blade. A crisp edge is possible if the panel is properly adhered. This is the ideal method if you plan to scroll saw the veneered project. |
Application Tools |
Polyurethane Roller |
A vacuum press is ideal but other face-clamping options work as well. |
Cure Time |
Approximately 20 minutes |
Approximately 90 minutes |
Fumes/V.O.C.'s |
Yes. Contact cement emits harmful fumes. It must be used in a well ventilated area. |
No. TC-20 does not emit any harmful fumes. |
Clean Up |
Most contact cements will clean up with lacquer thinner. |
TC-20 can be cleaned up with water while it's still wet. |
Coverage Per Pint |
25 Square feet (must apply to veneer and substrate) |
30 Square feet (apply to substrate only) |
Price |
$12.95 per quart |
$16.95 per pint |
| Notes: |
Don't try this with water-based contact cement. Only a solvent based contact cement will work. |
TC-20 is available at VeneerSupplies.com |
Method 1: Contact Cement
This is the simple way to apply copper veneer if you can work in a well ventilated area and don't mind the fumes.
 Use scissors to cut the copper veneer 1" larger than the substrate. Use scissors to cut the copper veneer 1" larger than the substrate.
- - Make sure all of the creases and wrinkles have been eliminated or minimized using the wood roller and vinyl sheeting. Be certain that the substrate material and copper veneer are free of any dust or debris.
-
- In a well ventilated area, apply contact cement to the face side of the substrate and the back side of the copper veneer.
-
- Follow the contact cement manufacturer instructions in regard to set times.
-
- When the contact cement is ready, carefully place the copper veneer onto the substrate and use the polyurethane roller to roll out the copper veneer from edge to edge. The key to a good bond is rolling every square inch of surface area. Be sure to apply firm downward pressure on the roller.
-
- The copper veneer is thin, so trimming is fairly easy. When the panel is finished, trim the edges with scissors or razor knife. You can also trim the edges by placing another board on top of the veneered panel and cutting off any excess with a table saw equipped with at least a 55 tooth blade. A router equipped with a flush trimming bit will also work. Do not use a veneer saw to trim the copper.
 Method 2: TC-20™ Copper Glue Method 2: TC-20™ Copper Glue
If you've used a vacuum press for wood veneering, you'll find that copper veneer works just like wood veneer. This is my preferred method of application. I'm definitely not a big fan of contact cement so I prefer using TC-20 copper veneer glue.
A vacuum press is not needed but it does have a tendency to leave a smoother surface on copper veneer. If you don't own a vacuum press, TC-20 can be applied to the substrate and clamped in place with a piece of plywood over it and with plenty of weight on top. Books, lumber and shop tools work well for weights.
- The TC-20 adhesive will bond to most porous substrates such as plywood, particle board and MDF. Begin by cutting the substrate 1/4" wider and longer than what is required for the project. This will give you room to trim the panel and get the edges perfect.
-
- Now use scissors to cut the copper veneer sheet to the same size at the substrate.
-
- Creases and wrinkles in the copper sheet are not uncommon. Luckily these are easy to remove. Simply place a small square of vinyl material over the crease and use a wood roller to press out the wrinkles. Be certain that the area under the copper veneer is free of any dust or debris which will add reverse-dimples and other markings to the copper surface.
-
- This step is critical!
Place the veneer face down on a smooth, clean surface. Gently scuff-sand the back of the copper veneer with 80 or 120 grit sandpaper. Be sure to scuff all parts that are to be bonded (especially corners and edges). Wear gloves while doing this to prevent any chemical residue from contacting your skin.
-
- In a well ventilated area, thoroughly wash the back side of the copper with water or acetone using a steel wool or synthetic steel wool (Scotch-Brite) pad. Be certain to wear gloves while doing this to prevent any chemical residue from contact your skin. Wipe off any residue.
-
- Scuff-sand the substrate with 80 or 120 grit sandpaper to ensure a perfect bond.
-
 The minimum use temperature for the TC-20 adhesive is 65°F. Using a glue roller, apply the glue to the substrate. Do not apply it to the copper veneer. A thin coat of glue is generally sufficient. The minimum use temperature for the TC-20 adhesive is 65°F. Using a glue roller, apply the glue to the substrate. Do not apply it to the copper veneer. A thin coat of glue is generally sufficient.
- - Place the copper veneer onto the substrate. To prevent shifting, tape the copper veneer to the edge of the substrate. Be sure to use blue masking tape. Regular masking tape will be hard to remove after pressing the panel.
-
 If you are using a vacuum press, place the panel in the vacuum bag and clamp it shut. Allow the press to run for 45 minutes before removing the panel. The ideal vacuum level for pressing copper is 15" of Hg, but always do a test panel to be certain. If you are using a vacuum press, place the panel in the vacuum bag and clamp it shut. Allow the press to run for 45 minutes before removing the panel. The ideal vacuum level for pressing copper is 15" of Hg, but always do a test panel to be certain.
- - If you opt to use a different clamping method, be sure to apply evenly distributed pressure to the entire panel surface. Allow the panel to cure for 45 minutes before unclamping.
-
- You'll notice that the bond is very weak when the panel is first removed from the press. Curing takes a minimum of 90 minutes outside of the press but allow 24 hours for a full bond especially if you are machining the panel.
-
- Since the copper is thin, the edges can be trimmed with a table saw or miter saw equipped with a sharp blade with at least 55 teeth. A router with a flush trimming bit works nicely as well. Do not use a veneer saw to trim the copper.
Adding Flash to Pizzazz
For even more character, you can opt to distress the copper veneer by poking holes in after it is pressed. And for the ultimate distressing, some artisans have dented, dinged, and creased the surface using the wood roller. These randomly spaced "character marks" give the panel a hand-worked feel and an antique look.
Copper Finish Options
Most of the copper veneers are available with a wax finish, a lacquer finish, or no finish at all. There are some patina/color types which do not have a wax finish option simply because the colorant on the copper sheet requires lacquer to "lock in" the pattern.
The wax finish often has slightly dull sheen and gives the copper a more organic appearance. A good coat of paste wax will bring out the best in the copper and protect it as well. Carnauba based car wax works quite well but any wax will work as long as it doesn't have "cleaner" or polishing agents in it. The wax finish option should only be ordered for your copper veneer if you have no plans to further protect the finish other than with additional coats of wax.
The lacquer finish is glossy and can change the vibrance of certain patina colors. The high gloss nature of the lacquer finish can allow scratches to be more visible, but a coat of furniture-grade paste wax will help protect the lacquered copper from mild abrasion. It's also important to note that cracking and crazing can occur on lacquer copper veneers if the sheet is bent to a tight radius.
Better protection is needed if you are using the copper veneer for table tops and shelving. To increase the durability of a lacquered copper sheet you can apply another coat of standard lacquer (available at most hardware stores) but always test it on a scrap piece of similar copper first.
The ideal protective coating for bar top and counter tops is poured-on epoxy. Many hardware stores carry this type of finish. Be aware that poured-on epoxy finishes will not stick to a waxed copper veneer.
Questions? Click here to see the Copper Veneering FAQ.
|


