|

The bag closure will be used to close the open end of the bag after you have inserted the veneer, substrate, and platens. Getting a good seal is not difficult. Read more about closures below to see which is best for you.
Method 1: Tube & Sleeve or C-Channel Closure (Commercial)
 This type is the most common closure system sold with vacuum bags. VeneerSupplies.com has this type of vacuum bag closure in two lengths. Simply roll the bag end over the tube. Then snap the C-channel over the bag starting from one side and working towards the opposite side. To ensure a perfect seal, be certain that the entire bag opening is secured by the closure and that there are no heavily wrinkles in the bag material. This type is the most common closure system sold with vacuum bags. VeneerSupplies.com has this type of vacuum bag closure in two lengths. Simply roll the bag end over the tube. Then snap the C-channel over the bag starting from one side and working towards the opposite side. To ensure a perfect seal, be certain that the entire bag opening is secured by the closure and that there are no heavily wrinkles in the bag material.

For additional clamping strength, you can attach spring clamps over the C-channel. This is not necessary under normal conditions but it will provide a better seal if the bag is heavily worn. For the ultimate gripping strength, the bag may be rolled over the tube twice before the C-channel is attached. I do not recommend more than a double roll over the tube due to the difficulty of removing the closure under such clamping pressure.
To remove the closure, pull the C-channel off of the PVC tube starting at one end and work toward to the opposite side until the closure is released.
There is one thing to note about this type of closure. It is very difficult to get a good seal if you are using a shop-made vacuum bag in which there is an overlap of the bag material on the top or bottom of the opening. If you have built a bag and your seams are not at the edges of the bag, it's best to use method 3 below.
Method 2: Tube & Sleeve or C-Channel Closure (Home-Made)
Suggested by Dan S. of Niskayuna, New York
I bought a piece of closet rod stock - 1 1/8" round slightly longer than my bag (5' in my case - $0.75/ft). I bought a piece of sch 40 1 1/4 ID PVC pipe -$0.37/ft (SCH40 is important because it is truely 1 1/4 ID). I ripped a slot in the pipe so what remains is slightly more than 1/2 way around - just enough so I have to apply a little pressure to snap it around the closet rod. Now I wrap the bag opening around the rod, snap the pipe over it and I have a near perfect seal. My pump cycles no more than once every 15 min and then for only about 30 sec. By the way - my wife suggested a shower rod cover snapped over the closet rod (bought at Bed Bath & Beyond for $1.30), that worked about as well as the original wood clap closure believe it or not - but I knew I could do better so I tried the pipe.
Method 3: DIY Dowel Closure
 Find a
hardwood board that is 5" wide, ¾" thick, and 30" long
(or 3" longer than your bag's width) and rip it in half. Now hold
the two pieces together (as if you were going to glue the ripped
edge back together). See if there is a slight bow. Sometimes wood
will do this and if it does, this time it will be an advantage. If not,
don't worry. Find a
hardwood board that is 5" wide, ¾" thick, and 30" long
(or 3" longer than your bag's width) and rip it in half. Now hold
the two pieces together (as if you were going to glue the ripped
edge back together). See if there is a slight bow. Sometimes wood
will do this and if it does, this time it will be an advantage. If not,
don't worry.
If there
is a bow, flip the boards around until you are looking at a gap in the
middle when they are held together and draw an arrow on each board
facing away from the side that has the gap.
Set up
your router (preferably router table) with a ½" core box bit and
raise the bit 1/4" high. Run both boards across this setup with the
arrows pointing down (if you are using the router table).
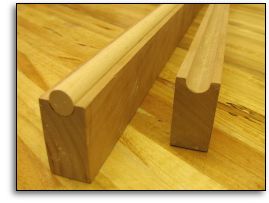
Glue a ½" dowel into one of the boards as shown above. The two
boards will now mate together nicely. Allow the dowel to dry before
continuing.
|
Assemble
the mated boards as shown in the picture to the right. On the
left and right side of the two boards, drill a 3/8" diameter
hole (about 1" in from the edges) from the top and into the
bottom board.
Take
the two boards apart and enlarge one hole on opposite board ends
with a 7/16" bit.
Glue a 3/8" diameter dowel in the 3/8" holes allowing
it to protrude by an inch or two at the top.
The
clamping jig will now slide-lock together and make it easier to
assemble the bag clamps on the vacuum bag.
|


|
 This
is your bag end closure. I prefer to use standard wood clamps starting
at one end. Then place another clamp at the opposite end. Just before
tightening this second clamp, use your index finger to pull the vinyl
bag away from the first clamp. This keeps the vinyl flat under the bag
closure. This
is your bag end closure. I prefer to use standard wood clamps starting
at one end. Then place another clamp at the opposite end. Just before
tightening this second clamp, use your index finger to pull the vinyl
bag away from the first clamp. This keeps the vinyl flat under the bag
closure.
Then place clamps along the length of the closure every 6 to
8 inches. Be sure to place a clamp over the seam overlap on the vacuum
bag. This is where most leaks occur.
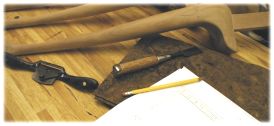
From Farrell Boris of
Old Westbury, New York:
 My bag clamp has "pockets" in it spaced evenly apart to accept the bar clamp. This allows the clamp to stay seated when tightening without the "wander" and also ensures even spacing between clamps. I used the appropriate diameter spade bit in my drill press and made each pocket deep enough to seat the clamp pad flush with the top of the bag clamp. My bag clamp has "pockets" in it spaced evenly apart to accept the bar clamp. This allows the clamp to stay seated when tightening without the "wander" and also ensures even spacing between clamps. I used the appropriate diameter spade bit in my drill press and made each pocket deep enough to seat the clamp pad flush with the top of the bag clamp.

|